Let's set the table together.

Inspiring moments and memories shared around The Table Together.

Filtering by Category: Kitchen Hacks

Wonton Wrappers & Impromptu Weeknight Ravioli! | Tuesday’s Tip of the Day!

Today, we are stepping outside of the box and introducing a whole new concept when it comes to making ravioli. Wonton wrappers, readily available at most grocery stores, make for an easy replacement with your classic pasta sheets and yield the same texture and outcome when cooked. Heck, your guests may not even know! In fact, because they are so simple to use–and save time from rolling out fresh pasta dough by hand–wonton wrappers frequently make an appearance in my kitchen.

Before you begin:

  • Wash and dry your hands.
  • Make a filling for your ravioli: Open your fridge and consider the possibilities. Some of my favorite fillings are the simplest. For example, ricotta, fresh herbs, an egg, parmesan cheese, salt, and a crack of pepper is one of my favorites!
  • Make a sauce, keep it hot!
  • Bring a large pot of heavily salted water to a boil: For faster results, salt the water after it reaches a boil.
  • Lightly flour your countertop.
  • Lightly flour a parchment paper lined baking sheet.

Wonton Wrappers:

  1. Prepare the wontons:
    1. ightly flour a work surface with flour.
    2. Lay one wonton wrapper down and place a small spoonful of filling in the middle leaving a 1-inch boarder around all four sides.
    3. Using slightly wet finger tips, “brush” a thin layer of water around each side, as if you were “licking” an envelope.
    4. Place the second wonton wrapper on top, and using a fork, gently press down along the sides forming a seal.
    5. Transfer to the prepared flour dusted parchment paper, and repeat with the remaining wontons.
  2. Cook: In a large pot of salted boiling water, working in batches if needed to not overcrowd the pot, cook ravioli for 2 – 3 minutes, or until done.
  3. Sauce & Serve: Using a slotted spoon, remove cooked ravioli, and transfer directly to your sauce. Toss and serve while hot.

For other terrific tips and hundreds of recipes, like my walnut and kale pesto, a classic tomato Pomodoro sauce, or even my classic Bolognese, visit my website (thetabletogether.com). While there, consider “subscribing” and I will send a new tip or blog post directly to your inbox every Tuesday and Wednesday morning!

P.S. Make sure you check out my YouTube channel, The Table Together with Tiffany Lewis, for dozens of videos solely dedicated to bringing all of these fantastic tips and recipes to life!

Cheers to starting a new tradition around The Table Together!


Sincerely,


Tiffany Lewis

Founder and true believer in the power of bringing people around The Table Together!

Hasselback Potatoes: This Sexy Spud's Play-By-Play | Tuesday's Tip of the Day

Melissa's Produce Fingerling Potatoes | Photo: Tiffany Lewis

Melissa's Produce Fingerling Potatoes | Photo: Tiffany Lewis

Hasselback potatoes are all the rage right now! Show-stopping, jaw-dropping, spectacular “how the heck do you do that” kind of rage. The best part, although so sophisticated to the eye, is that they are easy to make and just require a few tools and steps before the oohh’s and aahh’s set in. And, if you find that your giving yourself high fives–because if anyone else was there they would be the receiving end of your excitement–I don’t blame you one bit! Now, come join me on this hasselback bandwagon and let’s get cook’n! 

Where does the name hasselback come from? Although football legend Matt Hasselbeck may enjoy potatoes, the credit goes to the “Swedes — and the chefs at Restaurant Hasselbacken, in particular — for the invention of this particular style of potato. They also sometimes go under the name Accordion Potatoes or (my favorite) Pillbug Potatoes. Whatever you call it, the result is the same: a single potato, sliced into thin wedges but left joined at the bottom, baked until the layers fan out into rounds of crispy bliss.” - TheKitchn

Definition: First of all, I should make one note…hasselback potatoes are easy to make but require a little time and patience. In summary, and in its’ simplest purest form, hasselback potatoes are sliced across the entire potato from one end to the other without your knife cutting all the way through the bottom of the potato. So, when you hold up the potato, it stretches like an accordion which is why some people call this style of potato an accordion potato. Simple enough, right?

What you need:

Fingerling Potato Medley, Melissa's Produce | Photo: Tiffany Lewis

Fingerling Potato Medley, Melissa's Produce | Photo: Tiffany Lewis

  • Potatoes: Yukon are my favorite, but russet, red potatoes and my personal favorite, Melissa’s Produce Fingerling Potato Medley, will all work just as well. The fingerling will take longer to prep as they are smaller and have to be done one at a time, but they are so darn cute you may just want to take the time!
Fingerling Potato Medley, Melissa's Produce | Photo: Tiffany Lewis

Fingerling Potato Medley, Melissa's Produce | Photo: Tiffany Lewis

  • Chopsticks! There are a few things that will make this easier and they involve taking an extra set of chopsticks on your next sushi takeout order. That’s right, chopsticks! Chopsticks are just thick enough that they will act as an aid when slicing your potatoes. If you think about it, chopsticks are the perfect–cheap–option for stopping your knife blade from cutting all the way through the potato and severing it in half.
  • Sharp Knife: This part is important as you want to cut through your potato in smooth strokes creating even width slices across. A dull knife is not only an unsafe knife, it can make it hard to cut through…remember, this potato isn’t cooked yet.
  • Patience: This may take a while, especially if you are doing the fingerlings, so pour yourself a glass of wine, tea, coffee or beverage of choice, crank the tunes and enjoy the process.

The Spud Play-by-Play:

1.     Scrub your spuds with a potato scrubber.

2.     Starting with one potato at a time, line up your chopsticks like guardrails, on either side of the potato.

3.     Taking a sharp knife, start at one end and cut all the way across the diameter of the potato stopping when the knife hits the chopsticks. Repeat these steps, spacing ¼-inch to ½-inch apart.

4.     Repeat this process with all potatoes.

5.     Line a baking sheet with parchment paper and place potatoes on top.

6.     Generously drizzle oil across each potato opening the cracks to ensure oil is coating inside the slits too! Season with salt, pepper and herbs or spices of choice if using.

7.     Place in preheated 425ºF oven and roast until crispy and “done.”

8.     Remove, allow to cool and sit back as the praise comes flowing in!

For other terrific tips and hundreds of recipes, visit my website (thetabletogether.com). While there, consider “subscribing” and I will send a new tip or blog post directly to your inbox every Tuesday and Wednesday morning!

P.S. Make sure you check out my YouTube channel, The Table Together with Tiffany Lewis, for dozens of videos solely dedicated to bringing all of these fantastic tips and recipes to life!

Cheers to starting a new tradition around The Table Together!

Sincerely,

Tiffany Lewis

Founder and true believer in the power of bringing people around The Table Together


Holiday Baking 101: How to Create a Parchment Overhang | Tuesday’s Tip of the Day!

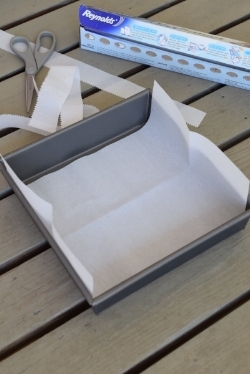
Come that time of year where stockings are hung, trees are adorned with ornaments and carolers are singing songs of holiday cheer and yule tidings, it’s time to dust off our favorite hand-me-down recipes for Grandma’s fudge and peanut brittle. Today, I am going to show you a super simple way to make your holiday bars and candies that much more rewarding with minimal waste and cleanup.

Step one:

Using baking spray, like Pam Baking Spray, line the bottom and sides of your square or rectangular baking dish. Make sure you reach the corners as well! The baking spray will act as “glue” to hold your parchment in place.


110 T Holiday Baking 101 A How to Create a Parchment Overhang 01.jpg

Step two:

Using a pencil, trace the width of your baking dish while allowing a 2-inch portion hanging over the side. This is what you will hold on to when you neatly and gently lift the bars from the baking dish. Using scissors, trim the parchment paper making sure it fits perfectly width wise in the pan without any layover, bunching or creases on the side.  If there are creases on the side, the bars will take on that shape as the batter seeps between them using the crease as a mold during the baking process. 

110 T Holiday Baking 101 A How to Create a Parchment Overhang 02.jpg

Step three:

Repeat this step going the other way creating, also allowing a 2-inch overhang on either side. Now, both pieces of parchment paper should be overlapping on the bottom and reaching over on all sides.  If the parchment paper keeps rolling inside the pan, turn the parchment paper upside down as sometimes, depending on how the parchment paper was stored or rolled in the container, it naturally wants to keep rolling. In this case, I lay the parchment the opposite way it naturally wants to roll, think turning it inside out against the natural roll from the container it came in. 

Step four:

Add your batter and using an offset spatula, spoon or rubber spatula, smooth the top into an even layer. If the parchment paper keeps folding into the middle, hopefully you caught this under step three, make a crease at the overhang in the hopes the heavy crease will weigh down the sides helping to secure them where they belong.

Step five:

Bake or “set” according to recipe directions.

Step six:

If baking, allow the treats to “set” for 15 minutes before lifting. If you lift to early, and before the baked goods have had a chance to “set”,  they could break or crumble. When ready to lift, take hold of two opposing side’s handles and carefully lift. Transfer to a cutting board and allow to fully cool before cutting into desired size bars. 

For other terrific tips and hundreds of recipes, including numerous utilizing parchment overhang, like my Chocolate Pecan FudgePeanut Butterfinger Fudge, or even my Salted Chocolate Chip Cookie Bars,  visit my website (thetabletogether.com). While there, consider “subscribing” and I will send a new tip or blog post directly to your inbox every Tuesday and Wednesday morning! 

P.S. Make sure you check out my YouTube channel, The Table Together with Tiffany Lewis, for dozens of videos, including a tutorial on making the most delicious – and easiest – fudge ever, solely dedicated to bringing all of these fantastic tips and recipes to life! 

Cheers to starting a new tradition around The Table Together!


Sincerely, 


Tiffany Lewis

Founder and true believer in the power of bringing people around The Table Together!

Removing the Smell of Garlic from your Fingertips | Tuesday’s Tip of the Day!

The smell of roasted garlic penetrating your home…one of my all-time favorite smells! It reminds me of friends, family and a delicious home-cooked meal where we all tightly nestle around the table together! However, it’s that smell of garlic on your fingertips as you prepare for bed and make breakfast the following morning that I could live without. Here is a quick tip for removing the residue on your fingertips: Stainless Steel! Whether your kitchen sink, faucet or bottom of your cookware, stainless steel is your saving grace! Simple rub your hands vigorously on the stainless steel and smell as the odor quickly escapes.  And, for those who may be wondering what you are doing rubbing your hands on your kitchen faucet, just remind them that one day, they may also benefit from this nifty little tip!

For other terrific tips and hundreds of recipes, including several with garlic, visit my website (thetabletogether.com). While there, consider “subscribing” and I will send a new tip or blog post directly to your inbox every Tuesday and Wednesday morning!

P.S. Make sure you check out my YouTube channel, The Table Together with Tiffany Lewis, for dozens of videos solely dedicated to bringing all of these fantastic tips and recipes to life!

Cheers to starting a new tradition around The Table Together!

Sincerely,

Tiffany Lewis

Founder and true believer in the power of bringing people around The Table Together!

Revitalizing Crystalized Honey | Tuesday's Tip of the Day!

I absolutely hate when I reach for my precious honey bear only to find the honey has crystalized! And, of course, this only happens when you have company over and honey is needed right now, or rather 5 minutes ago! Here is a quick and easy way to revitalize your crystalized honey with little to no effort!

  • Stovetop: Bring a small pot of water to just below a simmer. Add honey jar ensuring water is not covering the top. Allow to sit in hot water until honey loosens, 30 seconds – 2 minutes.
  • Microwave: Remove the honey jar lid and microwave on low, while keeping a close eye, until honey loosens. 

For other terrific tips and hundreds of recipes, visit my website (thetabletogether.com). While there, consider “subscribing” and I will send a new tip or blog post directly to your inbox every Tuesday and Wednesday morning!

P.S. Make sure you check out my YouTube channel, The Table Together with Tiffany Lewis, solely dedicated to bringing all of these fantastic tips and recipes to life!

Cheers to starting a new tradition around The Table Together!

Sincerely,

Tiffany Lewis

Founder and true believer in the power of bringing people around The Table Together!

Coffee Ice Cubes | Tuesday's Tip of the Day!

Ever wonder what to do with that leftover French press or morning coffee carafe? How about freezing it in ice cube trays for a clever way to chill ice coffee without watering it down? Plus, just imagine telling your friends that you are sipping on coffee outfitted with coffee cubes. This also works with leftover ice tea or even lemonade. Sometimes, the simplest things are the most impressive – case in point!

For other terrific tips and hundreds of recipes, visit my website (thetabletogether.com). While there, consider “subscribing” and I will send a new tip or blog post directly to your inbox every Tuesday and Wednesday morning!

P.S. Make sure you check out my YouTube channel, The Table Together with Tiffany Lewis, solely dedicated to bringing all of these fantastic tips and recipes to life!

Cheers to starting a new tradition around The Table Together!

Sincerely,

Tiffany Lewis

Founder and true believer in the power of bringing people around The Table Together!

Adding Rice to the Salt Shaker | Tuesday's Tip of the Day!

Don’t you hate when salt in your salt shaker gets lumpy? Me too! Here’s a little trick to prevent that (for salt shakers only!).

Add a few pieces of (uncooked) rice to your salt shaker and shake to evenly incorporate. The rice will absorb any excess moisture keeping your salt in tip top shaking shape.

For other terrific tips and hundreds of recipes, visit my website (thetabletogether.com). While there, consider “subscribing” and I will send a new tip or blog post directly to your inbox every Tuesday and Wednesday morning!

P.S. Make sure you check out my YouTube channel, The Table Together with Tiffany Lewis, solely dedicated to bringing all of these fantastic tips and recipes to life!

Cheers to starting a new tradition around The Table Together!

Sincerely,

Tiffany Lewis

Founder and true believer in the power of bringing people around The Table Together!